Want to learn how to make honey? This comprehensive guide covers all aspects of beekeeping, from selecting the right beehive and bee species to harvesting, storing, and packaging your own delicious honey.
Beekeeping Basics
Beekeeping is an incredibly rewarding and fascinating hobby that allows individuals to connect with nature and contribute to the preservation of honeybees. Whether you are a beginner or have some experience, understanding the basics of beekeeping is crucial to ensure the well-being of the bees and a successful beekeeping venture. In this section, we will explore three fundamental aspects of beekeeping: choosing the right beehive, selecting the right bee species, and providing adequate shelter for bees.
Choosing the Right Beehive
Choosing the right beehive is essential for the overall health and productivity of your bee colony. There are several types of beehives available, each with its own advantages and disadvantages. Two popular choices are the Langstroth hive and the top-bar hive.
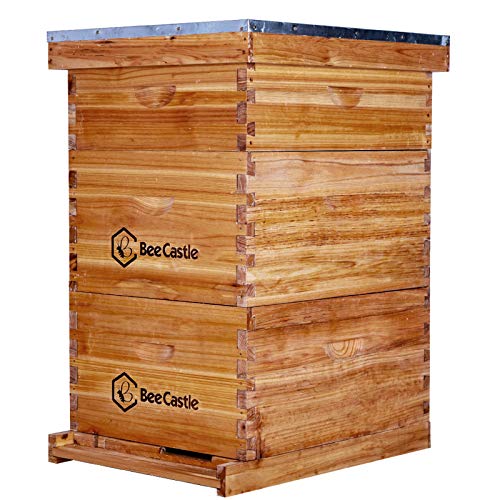
The Langstroth hive, named after its inventor Reverend Lorenzo Lorraine Langstroth, is the most commonly used beehive. It consists of stacked boxes with frames that allow bees to build their combs. This hive provides excellent ventilation and is easily expandable, making it ideal for larger colonies. Additionally, the standardization of Langstroth hive equipment makes it easier to find replacement parts and accessories.
On the other hand, the top-bar hive is a horizontal hive without frames. Instead, it features bars where bees can build their combs. This hive design mimics the natural behavior of bees more closely and requires less equipment and maintenance. It is an excellent choice for beekeepers who prefer a more hands-off approach and prioritize bee health and natural comb building.
When choosing a beehive, consider your level of experience, available space, and personal preferences. It’s important to remember that the hive you choose will affect the management techniques and the ease of accessing honey and inspecting the colony.
Selecting the Right Bee Species
Selecting the right bee species is crucial in ensuring the success of your beekeeping venture. The two primary species of bees used in beekeeping are Apis mellifera (the European honeybee) and Apis cerana (the Asian honeybee).
European honeybees are the most widely used species in North America and Europe. They are known for their gentle temperament, high honey production, and ability to adapt to different climates. European honeybees are excellent for beginners and are easily managed.
Asian honeybees, on the other hand, are commonly found in Asian countries. They have unique characteristics and behaviors, and their management requires specific knowledge and skills. While they can be highly productive, they are generally not recommended for beginners due to their aggressive temperament and susceptibility to certain diseases.

When selecting the right bee species, consider your location, climate, and personal goals as a beekeeper. It’s important to choose a species that is well-suited to your environment and matches your level of experience and available resources.
Providing Adequate Shelter for Bees
Providing adequate shelter for bees is vital to their survival and well-being. Bees require a safe and comfortable place to live, protect their brood, and store honey. Here are some essential factors to consider when providing shelter for bees:
- Location: Choose a location for your beehive that offers protection from extreme weather conditions, such as strong winds and direct sunlight. Ideally, the hive should be placed in an area with a good source of nectar and pollen, away from high human activity.
- Orientation: The entrance of the beehive should face south or southeast to allow the bees to benefit from the morning sun and gain warmth early in the day.
- Ventilation: Proper ventilation is crucial to prevent moisture buildup inside the hive, which can lead to mold and other issues. Ensure that your beehive has adequate ventilation, such as screened bottom boards or ventilation holes.
- Insulation: Insulating the beehive can help regulate the temperature inside, protecting the bees from extreme heat or cold. Consider using insulating materials, such as foam or straw, during winter months.
- Protection: Bees are vulnerable to predators, such as bears, skunks, and raccoons. Install appropriate barriers, such as electric fencing or hive stands, to protect your hive from potential attacks.
By providing bees with a suitable shelter, you create an environment where they can thrive and fulfill their vital role in pollination and honey production. Remember, a well-maintained hive not only benefits the bees but also allows beekeepers to enjoy the rewards of their hard work.
In the next section, we will delve into the process of setting up a beehive, including finding the ideal location, assembling the beehive components, and installing frames and foundation.
Stay tuned for the exciting journey ahead!

Setting Up a Beehive
Setting up a beehive is an exciting and rewarding venture that allows you to connect with nature and contribute to the delicate balance of our ecosystem. Whether you are a hobbyist or a seasoned beekeeper, careful planning and attention to detail are essential for a successful start. In this section, we will guide you through the process of setting up a beehive, from finding the ideal location to assembling the components and installing frames and foundation.
Finding the Ideal Location
Finding the ideal location for your beehive is crucial for the well-being and productivity of your bees. Bees thrive in areas with ample forage and access to water sources, so it’s important to consider these factors when choosing a location.
- Consider the proximity to forage: Bees rely on nectar and pollen from flowers to sustain themselves and produce honey. Look for a location with a diverse range of flowering plants, trees, and shrubs nearby. This will provide your bees with a variety of food sources throughout the year, ensuring their health and productivity.
- Ensure access to water: Bees need a water source to stay hydrated and cool their hive. Provide a shallow water feature, such as a birdbath or a small pond, within a short flight distance from the hive. Be mindful of preventing drowning risks by providing landing spots or floating objects for bees to safely access the water.
- Consider the surroundings: Choose a location away from high human traffic areas to minimize disturbances and potential conflicts. Avoid placing the hive near livestock or areas with heavy pesticide use, as these can be harmful to bees. Additionally, ensure that the hive is protected from strong winds and extreme weather conditions.
Assembling the Beehive Components
Once you have found the perfect location for your beehive, it’s time to assemble the components. Before you begin, make sure you have all the necessary materials and tools, including the hive body, frames, foundation, and protective gear.
- Hive body: The hive body is the main structure that houses the bees and their honey production. It consists of boxes or supers stacked on top of each other. Assemble the hive body according to the manufacturer’s instructions, ensuring a secure and level foundation.
- Frames: Frames hold the foundation, providing structure for the bees to build their honeycomb. Each frame has a top bar, bottom bar, and side bars. Carefully insert the frames into the hive body, leaving enough space between them for the bees to move freely.
- Foundation: Foundation is a thin sheet made of beeswax or plastic that serves as a guide for the bees to build their honeycomb. It comes in different sizes, such as deep, medium, or shallow, depending on the type of hive you are using. Gently insert the foundation into the frames, making sure it is centered and secure.
Installing Frames and Foundation
Installing frames and foundation is a critical step in setting up your beehive. Proper installation ensures that the bees have a solid foundation to start building their honeycomb and provides easy access for beekeepers to inspect the hive.
- Inserting frames: Carefully lift each frame and slide it into the hive body, ensuring that the top bar rests securely on the hive’s top edge. Leave a small gap between frames to allow bees to move around and access all areas of the hive.
- Installing foundation: Take each frame with the inserted foundation and gently slide it into the hive body. Ensure that the foundation is positioned vertically and aligned with the sides of the frame. This will encourage bees to build their comb within the frame, making it easier for you to manage the hive and extract honey later on.
- Maintaining proper spacing: It’s crucial to maintain proper spacing between frames to allow for easy inspection and hive management. Use a bee space tool or a spacer to ensure consistent spacing between frames. This will prevent the frames from sticking together and facilitate the bees’ movement within the hive.
Congratulations! You have successfully set up your beehive by finding the ideal location, assembling the components, and installing frames and foundation. Your bees now have a safe and comfortable home to thrive and start their honey production journey. In the next section, we will explore the various methods of obtaining bees, whether through buying a bee package or nucleus colony, catching a swarm, or attracting bees with bait hives.

Obtaining Bees
Beekeeping can be a rewarding and fulfilling hobby, but before you can embark on this journey, you need to obtain bees. There are several ways to acquire bees, and in this section, we will explore the different methods available to you.
Buying a Bee Package or Nucleus Colony
One of the most common ways to obtain bees is by purchasing a bee package or a nucleus colony. A bee package typically consists of a queen bee and a certain number of worker bees, enclosed in a screened box. This is a popular choice for beginners as it provides a ready-to-go colony that can be easily transferred into a hive.
On the other hand, a nucleus colony, often referred to as a “nuc,” is a small colony that typically consists of several frames of bees, brood, and food. Nucs are more established than bee packages and offer a head start in terms of colony development. They usually come in a nucleus box that can be directly placed into a hive.
When buying a bee package or a nuc, it is important to source them from reputable bee breeders or suppliers. Look for suppliers who prioritize the health and genetics of their bees. This ensures that you are starting off with healthy and resilient bees that have a better chance of thriving in your beekeeping venture.
Catching a Swarm
Another way to obtain bees is by catching a swarm. Swarming is a natural process where a colony divides, and a portion of the bees, along with the old queen, leave their original hive to establish a new colony. Swarms are often seen as a valuable resource for beekeepers as they provide an opportunity to capture a free colony.
To catch a swarm, you can set up bait hives in strategic locations to attract swarming bees. Bait hives are empty hives that are designed to mimic the conditions of a desirable nesting site for bees. By placing these bait hives in your apiary or other suitable locations, you increase the chances of attracting a swarm.
When a swarm moves into a bait hive, it is important to handle them with care. Swarming bees can be defensive during the initial settling period, so it is advisable to wear protective clothing and approach the swarm slowly and calmly. Once the swarm has settled, you can carefully transfer them into a permanent hive.
Attracting Bees with Bait Hives
Bait hives are not only useful for catching swarms but can also be used to attract bees from the surrounding area. By strategically placing bait hives in your garden or other locations, you can create an environment that is attractive to bees and encourage them to establish a colony nearby.
When setting up a bait hive, consider the preferences of bees. They are naturally drawn to dark cavities with a small entrance, such as tree hollows or crevices. Mimicking these conditions in your bait hive can increase its appeal to passing bees.
Here are some tips for setting up an effective bait hive:
- Choose a dark-colored hive or paint the exterior in earth tones to create a natural appearance.
- Position the hive at a height of around 10-15 feet, as bees prefer elevated locations.
- Place the hive in a sheltered area, away from direct sunlight and strong winds.
- Use lemongrass oil or other attractants inside the hive to enhance its appeal.
Remember that attracting bees with bait hives is not an exact science. It may take time for bees to discover and choose your bait hive as their new home. Patience and persistence are key when using this method to obtain bees.
Caring for Bees
Beekeeping is a rewarding and fascinating hobby that requires proper care and attention to ensure the health and well-being of your bees. In this section, we will discuss three important aspects of caring for bees: feeding bees, monitoring and treating for pests and diseases, and inspecting the hive.
Feeding Bees
Feeding bees is crucial, especially during times when nectar and pollen sources may be scarce. By providing supplemental food, you can help your bees thrive and survive. There are different types of feed that you can give to your bees, depending on the specific needs of your colony.
One common method of feeding bees is through sugar syrup. This involves mixing sugar with water to create a solution that mimics the natural nectar they would find in flowers. To prepare sugar syrup, you can use a ratio of 1:1 (equal parts sugar and water) for spring feeding or 2:1 (two parts sugar and one part water) for fall feeding when bees need to store extra food for winter.
To feed sugar syrup to your bees, you can use a feeder placed inside the hive. There are various types of feeders available, including entrance feeders, top feeders, and frame feeders. Each has its own advantages and considerations, so it’s essential to choose the one that suits your beekeeping setup and preferences.
In addition to sugar syrup, some beekeepers also provide pollen substitutes or pollen patties. Pollen is an important source of protein for bees, and during times when natural pollen is scarce, supplementing their diet with a pollen substitute can ensure their nutritional needs are met. Pollen substitutes are typically made from a combination of ingredients such as soy flour, brewer’s yeast, and other essential nutrients.
Feeding bees is not just about providing food; it also involves observing their consumption patterns and adjusting accordingly. Regularly check the feeders and monitor how quickly the bees are consuming the food. If they are consuming it rapidly, you may need to provide more. Conversely, if they are not consuming it as quickly, it may be an indication that there are other food sources available, and you can reduce the amount of supplemental feed.
Monitoring and Treating for Pests and Diseases
Keeping a close eye on the health of your bees is essential for effective beekeeping. Regular monitoring allows you to identify and address potential issues before they become major problems. Pests and diseases can weaken the colony, reduce honey production, and even lead to its collapse if left untreated.
One common pest that beekeepers need to watch out for is the varroa mite. Varroa mites are tiny parasites that attach themselves to bees and feed on their hemolymph (bee’s version of blood). If left unchecked, varroa mites can weaken the bees, transmit diseases, and ultimately lead to the death of the colony. Regular monitoring of varroa mite levels can be done using sticky boards or alcohol washes, which help determine the mite load in the hive.
Apart from varroa mites, there are other pests and diseases that can affect bees, such as wax moths, small hive beetles, American foulbrood, and European foulbrood. It is important to educate yourself about these potential threats and learn how to identify the signs of infestation or infection.
Treatment options for pests and diseases vary, and it’s important to follow the recommended guidelines and regulations in your area. Some treatments involve the use of chemical substances, while others focus on natural or organic methods. Integrated Pest Management (IPM) is a holistic approach that combines various strategies to manage pests and diseases effectively.
Regular hive inspections are crucial for monitoring the overall health of the colony. During inspections, you can observe the behavior of the bees, check for signs of disease, and ensure that the hive is clean and well-maintained. Inspections also allow you to assess the honey production, the condition of the frames, and the presence of brood (bee larvae). By being proactive and attentive, you can address any issues or concerns promptly, ensuring the well-being of your bees.
Inspecting the Hive
Inspecting the hive is an essential task for every beekeeper. It provides valuable insights into the health and productivity of the colony. Regular inspections allow you to assess the overall condition of the hive and take appropriate measures to maintain its optimal functioning.
When inspecting the hive, it is important to be gentle and calm to avoid disturbing the bees. Start by removing the outer cover and carefully lifting the inner cover to expose the frames. Take note of the bees’ behavior and listen to the sounds they make. This can give you clues about their health and temperament.
During the inspection, pay attention to the brood pattern. A healthy hive should have a solid and consistent brood pattern, with eggs, larvae, and capped brood in different stages of development. Irregular patterns or the presence of discolored or sunken cells may indicate disease or other issues.
Inspecting the frames allows you to assess the honey stores and determine if the bees have enough food to sustain themselves. Look for capped honey cells and ensure that there is ample supply for the colony. If necessary, you can provide additional feeding as discussed in the previous section.
While inspecting, also check for any signs of pests or diseases. Look for the presence of varroa mites, wax moths, or any other indicators of infestation. If you notice any abnormalities, consult a local beekeeping association or a knowledgeable beekeeper for guidance on appropriate treatment methods.
Harvesting Honey
Harvesting honey is one of the most exciting and rewarding parts of beekeeping. It is the culmination of all your hard work and dedication to your bee colony. In this section, we will explore the key steps involved in harvesting honey, including knowing when to harvest, removing the honey supers, and extracting honey from the comb.
Knowing When to Harvest
Timing is crucial when it comes to harvesting honey. You want to make sure that your bees have produced enough honey to sustain themselves through the winter while also ensuring that the honey is mature and ready for extraction. So, how do you know when it’s the right time to harvest?
One way to determine if the honey is ready is by observing the bees’ behavior. When the honey is ripe, the bees will cap the cells with wax, sealing in the sweetness. This is a clear indication that the honey is mature and ready to be harvested. Additionally, you can use a refractometer to measure the moisture content of the honey. The ideal moisture level for honey is around 17-18%. If the moisture content is too high, the honey may ferment or spoil.
Removing the Honey Supers
Once you’ve determined that the honey is ready for harvest, the next step is to remove the honey supers from the hive. Honey supers are additional boxes that are placed on top of the brood boxes to provide extra space for the bees to store honey. Here’s how you can safely remove the honey supers:
- Start by gently smoking the hive to calm the bees. This will make it easier for you to work without causing any harm to the bees or yourself.
- Carefully lift the top cover and inner cover to expose the honey supers. It’s important to handle the frames with care to avoid crushing the bees or damaging the comb.
- Inspect each frame and check if the cells are capped with wax. If the majority of the frames are capped, it’s a good indication that the honey is ready for harvest.
- Using a bee brush or a gentle puff of smoke, gently brush or blow the bees off the frames. Be sure to remove any bees that may have been trapped between the frames.
- Once the frames are free of bees, carefully lift them out of the hive and place them in a clean, covered container to prevent any contamination.
Extracting Honey from the Comb
Now that you have removed the honey supers from the hive, it’s time to extract the honey from the comb. There are several methods you can use to extract honey, including using a honey extractor or using the crush and strain method. Let’s explore these methods in more detail:
- Honey Extractor: A honey extractor is a device that uses centrifugal force to spin the honey out of the comb. This method allows you to extract honey without destroying the comb, making it easier for the bees to reuse it. To use a honey extractor, follow these steps:
- Uncap the honey cells using a hot knife or an uncapping fork.
- Place the frames in the honey extractor, making sure they are balanced evenly.
- Spin the frames at a moderate speed to extract the honey. The honey will collect at the bottom of the extractor.
- Open the honey gate at the bottom of the extractor and let the honey flow into a clean container.
- Crush and Strain Method: The crush and strain method is a simple and traditional way of extracting honey. It involves crushing the comb to release the honey and then straining it to remove any impurities. Here’s how you can do it:
- Uncap the honey cells using a hot knife or an uncapping fork.
- Place the uncapped frames in a clean container and crush the comb using a honey press or a potato masher.
- Allow the crushed comb to sit for a while to allow the honey to drain out.
- Place a fine mesh strainer or cheesecloth over another clean container and pour the crushed comb and honey mixture onto it. The honey will strain through, leaving behind any debris or wax.
Once you have extracted the honey, it’s important to properly store it to maintain its quality and freshness. We will explore the storage and packaging of honey in the next section.
Storing and Packaging Honey
Honey is a precious and delicious natural product that requires proper handling and storage to maintain its quality and flavor. In this section, we will explore the important steps involved in storing and packaging honey. From filtering and straining honey to choosing the right containers and ensuring proper labeling and sealing, we will cover everything you need to know to ensure your honey is preserved and presented in the best possible way.
Filtering and Straining Honey
When it comes to preparing honey for storage and packaging, filtering and straining are essential steps to remove any impurities and unwanted particles. Filtering honey helps to create a smooth and crystal-clear product, while straining helps to remove larger debris such as wax or bee parts.
To filter honey, you will need a fine-mesh strainer or a cheesecloth. Place the strainer over a clean container or directly over the storage container if it has a wide opening. Pour the honey slowly into the strainer, allowing it to pass through the mesh while trapping any impurities. You may need to gently stir the honey or use a spatula to help it flow through the strainer.
Straining honey is a similar process but involves using a coarser mesh or cheesecloth to catch larger particles. This step is especially important if you prefer a completely pure honey without any wax or pollen remnants.
By filtering and straining your honey, you ensure that it is visually appealing and free from any unwanted substances that may affect its taste or quality.
Choosing the Right Containers
Selecting the right containers for storing and packaging your honey is crucial to maintain its freshness and protect it from external factors. Here are some factors to consider when choosing containers for your honey:
- Material: Opt for food-grade containers made of glass or food-safe plastic. These materials are non-reactive and do not leach any harmful substances into the honey.
- Size: Consider the volume of honey you plan to store or sell. Smaller containers are ideal for personal use or gifting, while larger containers are suitable for commercial purposes.
- Shape: Honey containers come in various shapes such as jars, bottles, or squeeze bottles. Choose a shape that suits your preference and makes it easy for consumers to use and pour the honey.
- Sealing: Ensure that the containers have airtight seals to prevent any moisture or air from entering. This helps to maintain the honey’s freshness and prolong its shelf life.
- Visibility: Transparent containers allow customers to see the honey’s color and texture, which can be appealing. However, opaque containers protect the honey from light exposure, which can lead to color changes over time.
Remember to thoroughly clean and sanitize the containers before transferring the honey into them. This helps to prevent any contamination and ensures the honey remains safe for consumption.
Proper Labeling and Sealing
Properly labeling and sealing your honey not only adds a professional touch but also provides important information to consumers. Here are some key elements to include when labeling your honey:
- Product Name: Clearly state that it is honey and, if applicable, specify the floral source or any other unique characteristics.
- Producer Information: Include your name, brand, or business logo, along with contact details. This helps customers identify the source of the honey and reach out to you if needed.
- Net Weight: Specify the exact weight of honey in the container. This information is important for both regulatory compliance and consumer awareness.
- Ingredients: Honey is a pure product, but if you have added any flavorings or other ingredients, mention them on the label.
- Country of Origin: If your honey is sourced from a specific country or region, mention it on the label. Some consumers prefer to support local or specific origin honey.
Sealing your honey containers is crucial to prevent any leakage or spoilage during transportation and storage. Consider using tamper-evident seals or shrink bands to ensure the integrity of the product.
By labeling your honey accurately and sealing it properly, you provide transparency to consumers and build trust in your brand. Additionally, complying with labeling regulations ensures that your honey meets legal requirements for sale.
Troubleshooting Beekeeping Challenges
Dealing with Queen Issues
One of the key challenges beekeepers may face is dealing with queen issues. The queen bee plays a vital role in the hive, as she is responsible for laying eggs and maintaining the overall health and productivity of the colony. However, sometimes problems can arise with the queen, affecting the balance and functioning of the hive. Here are some common queen issues and how to address them:
Queen Loss
Losing a queen can be a significant setback for a beekeeper. Without a queen, the colony cannot reproduce or maintain its population. If you suspect that your hive has lost its queen, it is crucial to act quickly. One way to address this issue is by introducing a new queen to the colony. You can purchase a new queen from a reputable supplier or obtain one through a queen rearing program. Another option is to allow the bees to create a new queen by themselves. They will select a young larva and feed it royal jelly to develop into a new queen. Monitoring the hive closely and ensuring a healthy queen is essential for the overall success of your beekeeping endeavor.
Queen Supersedure
Queen supersedure occurs when the bees in a colony decide to replace their current queen with a new one. This can happen due to various reasons, such as the queen’s age or declining performance. When the bees sense that the queen is not fulfilling her duties effectively, they will begin the process of supersedure. This involves the bees creating a new queen by selecting a young larva and feeding it royal jelly. As a beekeeper, it is crucial to recognize the signs of queen supersedure, such as the presence of queen cells or a decrease in egg-laying activity. If you notice these signs, it is best to allow the bees to complete the supersedure process naturally. However, if multiple queens emerge, you may need to intervene and remove the extra queens to prevent swarming.
Queen Mating Issues
Successful mating is crucial for the queen to produce healthy and fertile eggs. However, queen mating can sometimes be challenging due to various factors, such as adverse weather conditions or the presence of aggressive drones. Poorly mated queens may result in a decrease in egg production or the production of infertile eggs. To address queen mating issues, it is essential to ensure a favorable environment for mating. This can be achieved by providing ample drone population and ensuring the availability of drone congregation areas. Additionally, selecting queens from reputable breeders known for producing well-mated queens can increase the chances of successful mating.
Handling Swarming Behavior
Swarming is a natural behavior of honey bee colonies, but it can pose challenges for beekeepers. Swarming occurs when a colony becomes overcrowded and the bees decide to split into two or more separate colonies. While swarming is a natural reproductive process, it can lead to a decrease in honey production and the loss of a portion of the colony. Here are some ways to handle swarming behavior:
Swarm Prevention
Preventing swarming starts with proper hive management. Regular inspections and monitoring of hive conditions can help identify potential swarming triggers. Providing sufficient space for the colony to expand, such as adding additional supers, can help alleviate overcrowding. Additionally, managing the brood chamber by ensuring the availability of empty comb for the queen to lay eggs can reduce the likelihood of swarming. By staying proactive and addressing colony needs promptly, you can minimize the chances of swarming.
Swarm Capture
If a swarm does occur, it is possible to capture and relocate it to a new hive. Swarms are generally docile and less defensive, making them easier to handle than established colonies. To capture a swarm, place an empty hive nearby and create a lure using pheromones or a frame of brood comb. The bees will be attracted to the new hive and gradually move in. Once the majority of the bees have entered the new hive, seal it and transport it to its new location. Capturing swarms not only helps prevent the loss of valuable bees but also provides an opportunity to increase your apiary.
Swarm Control Techniques
For beekeepers who want to actively manage swarming behavior, several techniques can be employed. One common method is artificial swarm creation, where the beekeeper manually divides the colony into two separate hives. This technique mimics the natural swarming process and can help prevent the loss of bees. Another technique is the use of swarm traps or bait hives. These are specially designed hives or boxes placed strategically to attract swarms. By providing an enticing environment for swarming bees, you can capture them and transfer them to a new hive before they establish a wild colony.
Addressing Honey Production Challenges
As a beekeeper, one of your primary goals is to harvest honey. However, various challenges can arise that may hinder honey production. Understanding and addressing these challenges is essential for maximizing your honey yield. Here are some common honey production challenges and ways to address them:
Insufficient Nectar Flow
Nectar flow refers to the availability of nectar-producing flowers for bees to collect nectar and convert it into honey. Insufficient nectar flow can occur due to factors such as drought, unfavorable weather conditions, or a lack of suitable forage in the vicinity of the hive. To address this challenge, consider relocating your hives to areas with abundant nectar sources during periods of low nectar flow. Alternatively, you can provide supplemental feeding to ensure the bees have enough food to maintain their population and produce honey.
Predation by Pests
Pests such as varroa mites, wax moths, and small hive beetles can wreak havoc on a hive, leading to a decline in honey production. Regular monitoring and treatment for these pests are crucial to maintain hive health. Integrated pest management techniques, such as using screened bottom boards and applying organic treatments, can help control pest populations without compromising the quality of the honey. Additionally, maintaining a strong and healthy colony through proper nutrition and hive management practices can increase their resilience against pests.
Environmental Factors
Environmental factors, such as extreme temperatures or adverse weather conditions, can impact honey production. Bees are sensitive to temperature fluctuations, and excessively hot or cold weather can affect their foraging activity and overall productivity. Providing adequate shade or insulation for the hive can help mitigate the effects of extreme temperatures. Moreover, ensuring a well-ventilated hive can prevent moisture buildup, which can lead to mold or other issues that may affect honey quality.
In conclusion, beekeeping challenges are inevitable, but with the right knowledge and proactive approach, they can be effectively addressed. Dealing with queen issues, handling swarming behavior, and addressing honey production challenges are vital aspects of successful beekeeping. By understanding the underlying causes and implementing appropriate strategies, beekeepers can ensure the health and productivity of their hives, ultimately leading to a rewarding honey harvest.