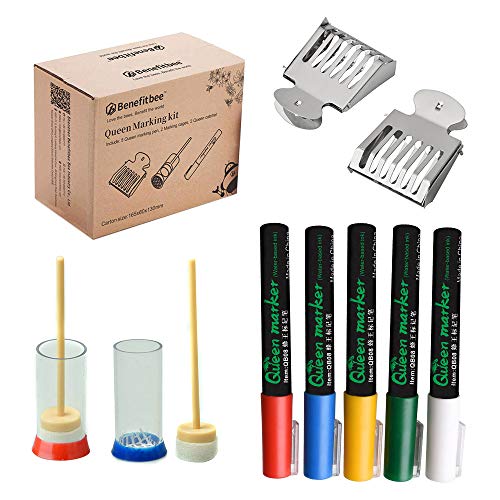
Discover the essential tools and materials needed to mark a queen bee, including a bee marking kit, queen bee catcher, and marking pen. Follow the step-by-step preparation and marking techniques, and learn about the color coding system for queen bee marking. Ensure proper post-marking care for your queen bees.
Tools and Materials for Marking a Queen Bee
When it comes to marking a queen bee, having the right tools and materials is essential. This ensures that the process is carried out smoothly and without causing harm to the queen bee or the hive. In this section, we will discuss three important tools that are commonly used for marking queen bees: the bee marking kit, queen bee catcher, and bee marking pen.
Bee Marking Kit
A bee marking kit is a handy tool that contains everything you need to mark a queen bee. It typically includes small, brightly colored plastic disks or cages, each with a number or letter printed on it. These disks are used to mark the queen bee, allowing beekeepers to easily identify her among the thousands of worker bees in the hive.
Using a bee marking kit is a simple process. First, the queen bee needs to be isolated from the rest of the bees in the hive, which we will discuss in more detail in the next section. Once the queen bee is isolated, she can be gently placed inside the marking cage or disk. The disk is then carefully positioned on her thorax, allowing the beekeeper to mark her with a specific color.
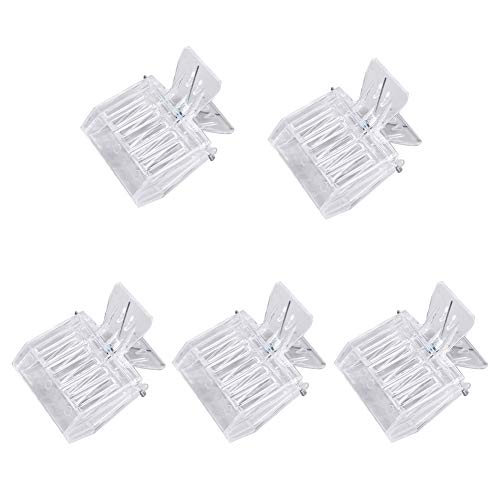
Queen Bee Catcher
A queen bee catcher is another tool that is commonly used when marking a queen bee. This tool is designed to safely capture the queen bee without causing her any harm. It usually consists of a small tube or cylinder with a mesh or screen on one end.

To use a queen bee catcher, the beekeeper positions the tube over the queen bee and carefully guides her into the tube using gentle movements. The mesh or screen at the end of the tube allows the worker bees to escape while keeping the queen bee safely contained. Once the queen bee is inside the catcher, the beekeeper can proceed with the marking process.
Bee Marking Pen
The bee marking pen is the final tool in our list of essential tools for marking a queen bee. This specialized pen is designed with a fine tip and contains a non-toxic ink that is safe for the queen bee and the hive. The ink is available in various colors, each representing a specific year.
Using a bee marking pen requires a steady hand and precision. The beekeeper gently holds the queen bee and carefully applies a small dot of ink to her thorax. This dot should be easily visible but not too large that it obstructs the queen bee’s movement or causes her any discomfort.
Utilizing these tools and materials ensures that the process of marking a queen bee is carried out effectively and with minimal disturbance to the hive. It allows beekeepers to keep track of the queen bee’s age, health, and performance, which is crucial for maintaining a thriving colony.
Preparation for Marking a Queen Bee
Finding the Queen Bee
When it comes to marking a queen bee, the first step is to locate her within the hive. While this may seem like a daunting task, there are several strategies you can employ to increase your chances of success.

One effective method is to carefully inspect each frame in the hive, looking for the queen among the worker bees. It’s important to approach this task with patience and a keen eye, as the queen can sometimes be difficult to spot due to her smaller size and distinctive appearance.
Another technique is to look for signs of the queen’s presence, such as the presence of eggs or larvae. The queen is the only bee in the colony capable of laying eggs, so finding these signs can indicate her location. Additionally, worker bees will often surround and attend to the queen, so observing their behavior can also provide clues.
Isolating the Queen Bee
Once you have successfully located the queen bee, the next step is to isolate her from the rest of the colony. This is important to ensure that you can safely handle and mark her without causing any harm.
One way to isolate the queen is by using a queen bee catcher. These specialized tools allow you to gently trap the queen while keeping her separate from the other bees. Queen bee catchers typically consist of a small cage or clip that can be placed around the queen, allowing you to safely remove her from the hive.
It’s essential to handle the queen bee with care during this process, as she is the heart of the colony and plays a crucial role in its survival. Gentle and steady movements will help minimize stress and potential harm to the queen.
Ensuring Safety Measures
Working with bees always carries some level of risk, so it’s important to take proper safety measures when marking a queen bee. This not only protects you but also ensures the well-being of the queen and the hive as a whole.
First and foremost, it’s crucial to wear protective gear, such as a beekeeping suit, gloves, and a veil. This will shield you from potential bee stings and provide an extra layer of protection.
Additionally, it’s recommended to work in a calm and controlled environment. Bees are highly sensitive to vibrations and disturbances, so minimizing noise and sudden movements can help keep them calm and prevent any unnecessary agitation.
Lastly, having a beekeeping partner or assistant can be beneficial. They can provide an extra set of hands and eyes, making the process smoother and safer. It’s always a good idea to have someone nearby who can assist in case of an emergency.
By following these preparation steps, including finding the queen bee, isolating her from the colony, and ensuring safety measures, you are well on your way to successfully marking a queen bee. These initial steps are crucial for creating a safe and controlled environment, setting the stage for the marking techniques that will be covered in the next section.

Marking Techniques for Queen Bees
When it comes to marking queen bees, there are a few techniques that can be used to ensure a successful and safe process. In this section, we will explore three important aspects of marking queen bees: using a marking cage, holding the queen bee properly, and applying the marking pen.
Using a Marking Cage
A marking cage is a valuable tool that can make the process of marking a queen bee much easier. This small cage is designed to hold the queen securely while allowing you to access her thorax for marking. The cage usually has a mesh or grid pattern that allows you to see and handle the queen without the risk of her flying away or getting injured.
To use a marking cage, follow these steps:
- Prepare the marking cage: Ensure that the marking cage is clean and free from any debris that could harm the queen bee. You can clean the cage using a mild soap solution and rinse it thoroughly.
- Gently catch the queen bee: Carefully catch the queen bee using a queen bee catcher or any other tool designed for this purpose. Be gentle and try not to harm her during the process. You can refer to the previous section on “Queen Bee Catcher” for more information on how to catch the queen bee safely.
- Place the queen bee inside the marking cage: Once you have caught the queen bee, transfer her into the marking cage. Make sure she is positioned comfortably and securely within the cage. The cage should provide enough space for her to move around but still restrict her from flying away.
- Hold the marking cage steadily: Hold the marking cage firmly but gently, ensuring that the queen bee is not being squeezed or harmed. This will allow you to have a stable hand while applying the marking pen.
Holding the Queen Bee Properly
Properly holding the queen bee is crucial to ensure a successful marking process. It is essential to handle her with care to prevent any accidental harm or stress. Here are some tips on how to hold the queen bee properly:
- Gently grasp the queen bee: Use your thumb and forefinger to gently grasp the queen bee’s thorax. Be cautious not to squeeze her too tightly or apply excessive pressure that could injure her. Remember, she is delicate and needs to be handled with care.
- Avoid holding the wings: When holding the queen bee, make sure to avoid grabbing or touching her wings. The wings are fragile and can be easily damaged, which could impair her ability to fly and navigate within the hive.
- Maintain a steady grip: It’s important to maintain a steady grip on the queen bee while marking her. This will ensure that you have control and precision while applying the marking pen. A steady hand will help prevent any accidental marking outside of the designated area on her thorax.
Applying the Marking Pen
Applying the marking pen is the final step in the process of marking a queen bee. The marking pen is specially designed with a non-toxic ink that is safe for the queen bee and easily visible for beekeepers. Here’s how to apply the marking pen:
- Prepare the marking pen: Before applying the marking pen, make sure it is in good condition and the ink is flowing smoothly. Shake the pen gently to ensure that the ink is well-mixed.
- Hold the marking pen properly: Hold the marking pen like you would hold a regular pen or marker. Make sure your grip is comfortable and allows for precise movement.
- Apply the marking pen: Carefully and gently touch the marking pen to the queen bee’s thorax. The ink should transfer onto her exoskeleton, creating a visible mark. Take care to apply the ink within the designated area specified by your chosen color coding system.
Remember, the marking pen should only be used on the queen bee’s thorax and not on any other part of her body. Applying the marking pen accurately will help you track the queen bee’s age and monitor her behavior effectively.
Queen Bee Marking Colors
Queen bee marking colors play a crucial role in beekeeping. They help beekeepers easily identify the queen bee in a hive, making it easier to monitor her behavior and track the overall health of the colony. In this section, we will explore the color coding system used for marking queen bees and discuss how to choose the right color for each year.
Color Coding System
Beekeepers use a color coding system to mark queen bees with specific colors, allowing for quick identification within the hive. Each year is assigned a specific color, following a rotation schedule that helps beekeepers keep track of the age of the queen bees in their colonies.
The color coding system typically involves the use of five colors: white, yellow, red, green, and blue. Each color represents a specific year in the rotation. For example, white may represent the year ending with 1 or 6, yellow for 2 or 7, red for 3 or 8, green for 4 or 9, and blue for 5 or 0.
By consistently marking queen bees with the designated color for the corresponding year, beekeepers can easily determine the age of each queen and make informed decisions regarding colony management.
Choosing the Right Color for the Year
When it comes to choosing the right color for the year, beekeepers need to consider the rotation schedule and ensure they follow it accurately. This helps maintain consistency across colonies and prevents confusion when identifying the age of queen bees.
It is important to note that the rotation schedule for may vary slightly depending on the region or beekeeping association. Beekeepers should consult local resources or experienced beekeepers to determine the correct rotation schedule for their specific location.
To choose the right color for the year, beekeepers can refer to the rotation schedule and identify the corresponding color. This information is typically available in beekeeping guides or online resources. It is essential to update and synchronize the color coding system annually to ensure accurate tracking of queen bees’ ages.
By adhering to the color coding system and consistently marking queen bees with the designated color for the year, beekeepers can easily monitor the performance and behavior of their colonies. This information is invaluable for assessing the overall health and productivity of the hive.
In addition to the color coding system, some beekeepers may use additional markings or symbols to further differentiate queen bees within a single year. These markings can provide additional information, such as the origin of the queen or specific breeding characteristics.
Overall, the color coding system for marking queen bees is a simple yet effective way for beekeepers to keep track of the age and performance of their colonies. By choosing the right color for each year and consistently marking queen bees, beekeepers can ensure the longevity and productivity of their hives.
Table: Rotation Schedule for Queen Bee Marking Colors
| Year Ending in | Color |
|---|---|
| 1 or 6 | White |
| 2 or 7 | Yellow |
| 3 or 8 | Red |
| 4 or 9 | Green |
| 5 or 0 | Blue |
Note: The rotation schedule may vary based on regional or beekeeping association guidelines. Please refer to local resources for accurate information.
In the next section, we will discuss the important steps for post-marking care of queen bees, ensuring their well-being and proper integration back into the hive. Stay tuned!
Note: The above information on is for informational purposes only. Always consult local resources or experienced beekeepers for specific guidelines and best practices in your area.
Post-Marking Care for Queen Bees
Allowing Time for Drying
After successfully marking a queen bee, it is crucial to allow the marking to dry completely before returning her to the hive. This process typically takes around 5-10 minutes, during which you should ensure that the queen bee is kept in a safe and controlled environment. Placing her in a well-ventilated area away from direct sunlight will help the marking ink dry faster. It is important to note that handling the queen bee during this time may smear or remove the marking, so it is best to avoid unnecessary contact.
Releasing the Queen Bee
Once the marking has fully dried, it is time to release the queen bee back into her colony. Carefully open the cage or container used to isolate her and allow her to crawl out on her own. Avoid shaking or dropping her, as this can cause unnecessary stress and potential harm. By gently releasing the queen bee, you are giving her the opportunity to rejoin her worker bees and resume her vital role in the hive.
Monitoring the Queen Bee’s Behavior
After releasing the queen bee, it is important to monitor her behavior closely. Observing how she interacts with the worker bees and the overall dynamics of the colony can provide valuable insights into the health and productivity of the hive. Keep a watchful eye on her movement, egg-laying patterns, and general demeanor. Any noticeable changes in behavior, such as aggression or a decrease in egg-laying, should be carefully noted and addressed accordingly.
Regular monitoring of the queen bee’s behavior is essential to ensure the overall well-being of the hive. By noting any abnormalities or changes, you can take appropriate measures to address potential issues and maintain a thriving bee colony.
To help you keep track of the queen bee’s behavior and any notable observations, you may find it useful to create a monitoring table. Here’s an example of how you can structure it using Markdown language:
| Date | Observations |
|---|---|
| DD/MM/YYYY | The queen bee is actively interacting with the worker bees, laying eggs consistently, and exhibiting calm behavior. |
| DD/MM/YYYY | Noticed a slight decrease in egg-laying activity, will continue to monitor closely. |
| DD/MM/YYYY | Queen bee displaying aggressive behavior towards worker bees, hive harmony disrupted. |
Using a table like this can help you record important details and track any patterns or changes over time. This information will be valuable in ensuring the health and productivity of your bee colony.
Remember, proper post-marking care for queen bees is essential to ensure their well-being and the success of your hive. By allowing time for drying, releasing the queen bee with care, and monitoring her behavior, you are taking important steps towards maintaining a thriving bee colony.