Discover the step-by-step process of using a refractometer for accurate measurements. From understanding its function to maintaining its accuracy, this guide covers everything you need to know.
Understanding Refractometers
Refractometers are essential tools used in various industries, such as food and beverage, pharmaceuticals, and automotive, to measure the refractive index of liquids. By understanding the principles behind refractometers, you can unlock their full potential and make accurate measurements. In this section, we will explore the basics of refractometers, including what they are, how they work, and the different types available.
What is a refractometer?
A refractometer is a scientific instrument that measures the extent to which light is bent, or refracted, as it passes through a liquid sample. This measurement, known as the refractive index, provides valuable information about the composition, concentration, and purity of the sample. Refractometers are widely used in quality control processes, research laboratories, and production facilities to ensure the consistency and accuracy of various liquids.
How does a refractometer work?
To understand how a refractometer works, let’s imagine it as a magic prism that bends light. When you place a liquid sample on the prism, light passes through it and gets refracted. The refracted light then enters a series of lenses and prisms inside the refractometer, eventually forming a visible pattern called a refractogram.
The refractogram is a representation of the refractive index of the sample. It can be observed through the eyepiece or displayed digitally on a screen, depending on the type of refractometer. By comparing the refractogram to a calibrated scale, you can determine the refractive index and, subsequently, valuable information about the sample’s properties.

Types of refractometers
Refractometers come in various types, each designed for specific applications and liquid samples. Let’s explore some of the most common types:
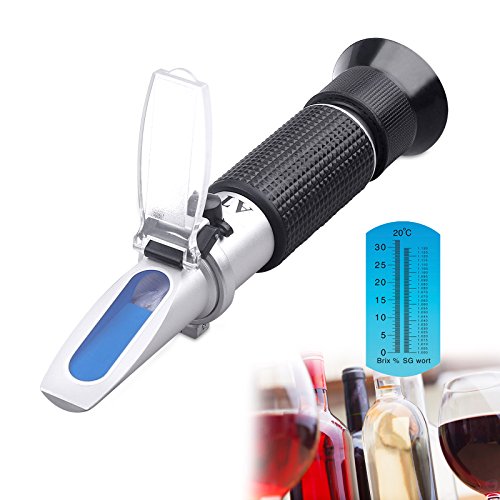
- Traditional Handheld Refractometers: These compact and portable refractometers are widely used in industries such as food and beverage, agriculture, and automotive. They typically consist of a prism, a cover plate, and a scale. Traditional handheld refractometers are user-friendly, affordable, and suitable for measuring the refractive index of liquids with a moderate range of concentrations.
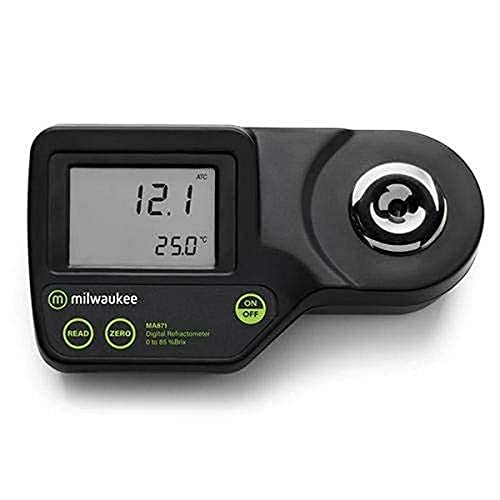
- Digital Refractometers: As technology advances, digital refractometers have become increasingly popular. These refractometers use an electronic sensor to measure the refractive index and display the results digitally. Digital refractometers offer enhanced accuracy, precision, and ease of use compared to traditional handheld models. They are particularly useful for measuring small sample volumes or liquids with high sugar content, such as fruit juices and honey.
- Abbe Refractometers: Abbe refractometers are sophisticated instruments used in research laboratories and industrial settings where high precision is required. They employ a prism and a monochromatic light source to measure the refractive index. Abbe refractometers often have advanced features, such as automatic temperature compensation and the ability to measure solids and powders.
- Inline Refractometers: Inline refractometers are designed to be integrated directly into production lines, providing real-time monitoring and control of liquid processes. They continuously measure the refractive index of the flowing liquid and transmit the data to a central monitoring system. Inline refractometers are commonly used in industries such as food processing, brewing, and chemical manufacturing.
These are just a few examples of the wide range of refractometers available. Each type has its unique features and advantages, allowing you to choose the most suitable one for your specific application.
Preparing the Refractometer
When it comes to using a refractometer, proper preparation is key to obtaining accurate and reliable measurements. This section will guide you through the necessary steps to prepare your refractometer before taking any measurements. From cleaning the refractometer to calibrating it and adjusting it for temperature, we will cover it all.
Cleaning the refractometer
Before using your refractometer, it’s important to ensure that it is clean and free from any residue or contaminants that could affect the accuracy of your measurements. Cleaning the refractometer is a simple process that requires a few basic steps:
- Begin by using a soft, lint-free cloth or tissue to gently wipe the prism surface of the refractometer. This will remove any dust or dirt particles that may be present.
- Next, dampen a clean cloth or tissue with a mild detergent or cleaning solution. Make sure to use a solution that is specifically recommended for cleaning refractometers.
- Carefully wipe the prism surface again, this time using the damp cloth or tissue. Be sure to remove any smudges or stains that may be present.
- Once you have cleaned the prism surface, use a dry cloth or tissue to wipe away any excess moisture. It’s important to ensure that the refractometer is completely dry before using it to take measurements.
By following these simple cleaning steps, you can maintain the accuracy and longevity of your refractometer.
Calibrating the refractometer
Calibrating your refractometer is an essential step to ensure accurate measurements. Calibration involves comparing the readings of the refractometer to a known standard, such as distilled water or a calibration solution. Here’s how you can calibrate your refractometer:
- Start by ensuring that your refractometer is clean and dry, as any residue or moisture can affect the calibration process.
- Place a few drops of the calibration solution or distilled water on the prism surface of the refractometer.
- Close the cover of the refractometer and allow the liquid to spread evenly across the prism surface.
- Look through the eyepiece and adjust the calibration screw or knob until the scale reads zero or matches the known standard.
- Once you have achieved the correct calibration, your refractometer is ready to use for accurate measurements.
Remember to calibrate your refractometer regularly, especially if you are working with different samples or if you notice any inconsistencies in your readings. Calibration ensures that your refractometer is providing accurate results, giving you confidence in your measurements.
Adjusting the refractometer for temperature
Temperature can significantly impact the accuracy of refractometer readings, as different samples have varying temperature coefficients. To compensate for temperature variations, it’s important to adjust your refractometer accordingly. Here’s how you can do it:
- Start by allowing your refractometer to reach the desired temperature, which is typically the same as the sample you will be measuring.
- Once the refractometer has reached the desired temperature, open the cover and place a few drops of the sample on the prism surface.
- Close the cover and allow the sample to reach the same temperature as the refractometer.
- Look through the eyepiece and read the refractive index or Brix value on the scale.
- If your refractometer has a temperature adjustment feature, use it to compensate for any temperature differences between the refractometer and the sample. Follow the manufacturer’s instructions to make the necessary adjustments.
By adjusting your refractometer for temperature, you can ensure that your measurements are accurate, even when working with samples at different temperatures.
In summary, preparing your refractometer involves cleaning it to remove any contaminants, calibrating it to ensure accurate readings, and adjusting it for temperature variations. By following these steps, you can set the stage for precise and reliable measurements. So, let’s move on to the next section and learn about collecting the sample for analysis.
Collecting the Sample
When it comes to using a refractometer, one of the most crucial steps is collecting the sample. This step ensures that you obtain accurate and reliable measurements. In this section, we will discuss the three essential aspects of collecting a sample: choosing the right sample, preparing the sample, and placing the sample on the refractometer.
Choosing the Right Sample
Choosing the right sample is the first step towards obtaining accurate readings with a refractometer. It is important to select a sample that is representative of the substance you want to measure. Whether you are testing the sugar content of a fruit juice or the salinity of a water sample, the sample should be a true reflection of the substance as a whole.
To choose the right sample, consider the following factors:
- Homogeneity: The sample should be well-mixed and homogeneous. This ensures that the readings taken from different parts of the sample will be consistent. If the sample is not homogeneous, it may lead to inaccurate measurements.
- Quantity: Sufficient quantity of the sample is necessary to ensure accurate readings. The refractometer requires a certain volume of the sample to cover the measuring prism adequately. Insufficient quantity may result in incomplete coverage and affect the accuracy of the measurement.
- Freshness: Some samples may undergo changes over time. For instance, certain substances may ferment or degrade, leading to variations in their properties. Therefore, it is important to use fresh samples to obtain reliable measurements.
Preparing the Sample
Once you have chosen the right sample, the next step is to prepare it for testing. Proper sample preparation ensures that the readings obtained are not influenced by any external factors. Here are some important considerations for preparing the sample:
- Temperature: The temperature of the sample can impact the refractive index and, subsequently, the readings. It is crucial to ensure that the sample is at the desired temperature before testing. If necessary, you can use a temperature-controlled environment or allow the sample to equilibrate to the desired temperature.
- Filtration: If the sample contains impurities or particles, it is essential to filter it before testing. Impurities can interfere with the light passing through the sample, affecting the refractive index readings. Filtration helps to remove any unwanted substances and ensures accurate measurements.
- Degassing: Some samples may contain dissolved gases, which can also affect the refractive index. To eliminate the influence of dissolved gases, it is recommended to degas the sample before testing. This can be done by gently stirring or agitating the sample to release any trapped gases.
Placing the Sample on the Refractometer
After the sample is prepared, it is time to place it on the refractometer for measurement. This step requires careful handling to ensure accurate readings. Here is a step-by-step guide on how to place the sample on the refractometer:

- Clean the prism: Before placing the sample, make sure that the measuring prism of the refractometer is clean and free from any residues. Residues can alter the refractive index readings and lead to inaccurate results. Refer to the previous section on cleaning the refractometer for detailed instructions.
- Open the cover plate: Most refractometers have a cover plate that protects the measuring prism. Gently open the cover plate to expose the prism.
- Apply the sample: Using a pipette or a dropper, carefully apply a few drops of the prepared sample onto the measuring prism. Be cautious not to touch the prism directly with your fingers, as oils or residues from your skin can affect the readings.
- Close the cover plate: Once the sample is applied, close the cover plate to protect the prism from external influences. Ensure that the cover plate is securely closed to maintain a stable environment for measurement.
- Wait for stabilization: Allow the sample to stabilize on the prism for a few seconds. This allows the refractometer to adjust to the refractive index of the sample and provides more accurate readings.
By following these steps, you can ensure that the sample is collected, prepared, and placed on the refractometer correctly. This will help you obtain reliable and precise measurements for various applications.
Now that you have successfully collected the sample, it’s time to move on to the next step: reading the refractometer. In the following section, we will explore how to interpret the scale, take the measurement, and record the results. Stay tuned for an exciting journey into the world of refractometry!
Reading the Refractometer
The process of reading a refractometer involves interpreting the scale, taking the measurement, and recording the results. In this section, we will guide you through each step, ensuring that you understand how to accurately read and interpret the readings from your refractometer.
Interpreting the scale
When you look at the scale of a refractometer, you will notice that it is marked with various numbers or values. These numbers represent the refractive index or the concentration of a substance in a solution. The specific scale you should use will depend on the type of refractometer you have.
For example, if you are using a Brix refractometer, the scale will typically measure the concentration of sugar in a solution. On the other hand, a refractometer used in the medical field may have a scale that measures the refractive index of bodily fluids.
To interpret the scale, start by placing a few drops of your sample on the prism or the measuring surface of the refractometer. Close the cover and look through the eyepiece or the viewfinder. You will see a line or a boundary where the sample and the background meet.
Align this boundary with the zero point or the reference line on the scale. The number or value that aligns with the boundary represents the measurement or concentration of the substance in your sample.
Remember to take note of any additional markings or units on the scale. Some refractometers may have dual scales or specific units of measurement that must be considered. Take your time to familiarize yourself with the scale before taking any measurements.
Taking the measurement
Once you have aligned the boundary with the zero point on the scale, you can proceed to take the measurement. To do this, simply read the value or number that aligns with the boundary.
Depending on the refractometer you are using, the measurement may be displayed as a number, a percentage, or a unit of measurement specific to the substance being tested. For example, a Brix refractometer may display the measurement as a percentage of sugar concentration.
It is important to ensure that you are taking the measurement while looking directly at the boundary and not at any reflections or distortions caused by the sample or the prism. This will help you obtain an accurate reading.
If you are unsure about the measurement or need to confirm its accuracy, you can repeat the process by cleaning the prism, preparing a fresh sample, and aligning the boundary again. This can help eliminate any potential errors or inconsistencies in your readings.
Recording the results
After taking the measurement, it is essential to record the results for future reference or analysis. This will allow you to monitor changes in the concentration or refractive index of a substance over time.
To record the results, use a pen and paper, a spreadsheet, or any other method that suits your needs. Write down the measurement, along with any additional information such as the date, time, sample source, or any relevant observations.
Organizing your results in a systematic manner can help you identify trends, compare measurements, or track the progress of a specific process or experiment. It is also useful when sharing data with colleagues, supervisors, or clients.
Remember to label your records clearly and keep them in a safe and accessible place. This will ensure that you can easily refer back to them whenever needed. Additionally, consider creating a backup or digital copy of your records to prevent any loss or damage.
Maintaining and Storing the Refractometer
Cleaning after use
Keeping your refractometer clean is crucial for accurate and reliable measurements. After each use, it’s important to properly clean the device to remove any residue or contaminants that may affect future readings. Here are some steps you can follow to ensure a thorough cleaning:
- Gently wipe the prism: The prism is the part of the refractometer where the sample is placed. Take a soft, lint-free cloth or a lens cleaning tissue and gently wipe the prism to remove any sample residue. Avoid using abrasive materials that could scratch the surface.
- Use a cleaning solution: For stubborn residues, you can use a mild cleaning solution specifically designed for refractometers. Follow the manufacturer’s instructions for dilution and application. Apply the solution to a clean cloth and wipe the prism gently.
- Rinse with distilled water: After using a cleaning solution, it’s important to rinse the prism with distilled water to remove any remaining residue. Distilled water is free from impurities that could affect the accuracy of your readings. Simply dampen a clean cloth with distilled water and wipe the prism gently.
- Dry thoroughly: After cleaning and rinsing, make sure to dry the refractometer completely. Use a clean, lint-free cloth or air dryer to remove any moisture. Moisture can cause inaccurate readings and damage the internal components of the refractometer.
Remember, never submerge the refractometer in water or use harsh chemicals for cleaning. These can damage the device and compromise its accuracy.
Proper storage methods
To maintain the longevity and accuracy of your refractometer, proper storage is essential. Here are some tips to keep in mind:
- Keep it in a protective case: When not in use, store your refractometer in a protective case. This will shield it from dust, moisture, and accidental damage. Many refractometers come with their own case, but if yours doesn’t, consider investing in one to ensure its safety.
- Avoid extreme temperatures: Refractometers are sensitive instruments that can be affected by extreme temperatures. Avoid storing them in areas with high heat or cold, as this can alter their calibration and accuracy. Optimal storage temperature usually ranges between 10°C to 40°C (50°F to 104°F).
- Protect against direct sunlight: Exposure to direct sunlight can cause damage to the prism and affect the readings of your refractometer. Store it in a shaded area or cover it with a cloth when not in use.
- Keep it away from chemicals: Chemicals like solvents, acids, and strong cleaning agents can corrode the prism and other components of the refractometer. Store it in a location away from any potentially harmful substances.
Maintaining the accuracy of the refractometer
Regular maintenance is essential to ensure the accuracy of your refractometer. Here are some practices you can follow:
- Regular calibration: Calibration is the process of adjusting the refractometer to ensure accurate measurements. Follow the manufacturer’s instructions to calibrate your refractometer regularly. This usually involves using a calibration solution with a known refractive index. By comparing the readings of the solution with the expected values, you can adjust the refractometer accordingly.
- Periodic servicing: Depending on the model and usage, it’s recommended to have your refractometer serviced by a professional at regular intervals. They can check for any internal issues, clean the internal components, and make any necessary adjustments to maintain accuracy.
- Handle with care: Refractometers are delicate instruments, so it’s important to handle them with care. Avoid dropping or subjecting them to unnecessary shock or impact. Proper handling will prevent damage to the internal mechanisms and ensure accurate readings.
- Keep it updated: Stay informed about any software or firmware updates provided by the manufacturer. Updating the refractometer’s software can enhance its performance and accuracy.
By following these maintenance and storage practices, you can ensure the longevity and accuracy of your refractometer, allowing you to obtain precise and reliable measurements for years to come.
| Source: | |
|---|---|